Table des matières
HomeBank : Aide
Introduction
HomeBank est un logiciel libre, simple et intuitif de gestion de finances personnelles. Il permet d’analyser en détail vos finances personnelles à l’aide de graphiques et d'outils de filtrage puissants.
Voici quelques-uns de ses points forts:
- Importation facile des fichiers OFX, QFX, QIF avec détection de doublons
- Gestion facile des transactions : signet, héritage, filtre, édition multiple, ordonnancement, rappel
- Gestion facile des bénéficiaires et des catégories : affectation automatique, ajout direct à partir du registre, auto-complétion
- champs uniques pour les transactions : visualisation de mode de paiement et de l'état, info sur le mode de paiement, étiquette
- importation et exportation de données dans un fichier de format CSV spécifique
HomeBank anticipe les coûts et aide à savoir d'où vient votre argent et où il va.
- Anticipe les coûts à venir : insertion avant terme d'une transaction prévue, évaluation du solde à venir
- Outils de rapport dynamiques, faciles et puissants avec graphiques
- Surveillance du solde dans le temps et alerte sur les découverts
- Analyse budgétaire simple et des coûts des véhicules
Utilisation
Importation de fichiers
HomeBank peut importer des fichiers téléchargés depuis votre banque, ou provenant de logiciels de comptabilité personnelle, comme Money, Quicken, GnuCash, dans le format de fichier pris en charge.
Étape 1 : Ouvrir l'assistant d'importation
Dans la fenêtre principale: * Sélectionnez le menu Fichier/Importer … * L'assistant d'importation s'ouvre et vous guide à travers les différentes étapes pour l'importation d'un fichier.
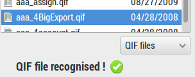
Étape 2 : Sélectionner un fichier à importer
Ici, vous allez sélectionner un seul fichier à importer. HomeBank positionne le filtre au format que vous venez de choisir dans le menu.
- Si le fichier n'est pas pris en charge :
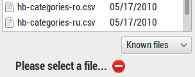
- Si le fichier est pris en charge :


Étape 3 : Préciser ce qu'il faut importer
Les étapes suivantes ne s'affichent que si vous devez valider ou confirmer une action.
Les propriétés du fichier ne s'affichent que si vous utilisiez le bouton de retour car HomeBank va directement à l'étape de vérification ou de modification.

Résumé du fichier en cours d'importation : nombre de comptes, transactions, bénéficiaires et catégories.
Quand vous importez un fichier QIF/CSV, HomeBank essaie d'importer avec le format configuré dans les préférences, sinon, il essaye de le détecter.
Si quelque chose se passait mal avec la date, ajustez les paramètres de préférences pour correspondre au format de date du fichier.
Comptes à importer

Selon le format du fichier, HomeBank essaye de faire correspondre le compte par son numéro ou son nom.
- Pour QIF : correspondance par le nom du compte
- Pour OFX : correspondance par le numéro de compte, HomeBank essaye de trouver le numéro OFX comme une sous-chaîne d’un numéro de compte.
- Pour CSV : création d'un compte par défaut
Certains fichiers QIF, ainsi que tous les fichiers CSV, ne comporetnt aucune information permettant d’identifier le compte à importer.
Dans ce cas, vous devrez le faire manuellement.
Transactions à importer

HomeBank détecte si une transaction dans le fichier en cours d'importation existe déjà dans le compte cible. Si oui, Homebank désactive l'importation et affiche une icône d'avertissement.
Le détail de la section des transactions existantes montre le transaction soupçonnée d'exister et permet de choisir ce qu'il faut faire.
Vous pouvez aussi modifier les paramètres de détection et actualiser la liste.
La détection de transaction existante se fait dans l'ordre suivant, selon la tolérance de date (0 jours par défaut).
- Même compte
- même quantité
- Même date (avec la tolérance configurée)
Étape 4: Confirmation

Affiche une synthèse de ce qui doit être importé et attend une dernière confirmation.
- nombre de comptes à actualiser ou créer
- nombre de transactions à importer
- nombre de transactions à rejeter
- nombre de transactions pour lesquelles l'attribution automatique a été faite pour le bénéficiaire et/ou la catégorie.
Formats de fichier pris en charge
- QIF - Quicken Interchange Format
- QFX - Quicken Financial Exchange
- OFX - Open Financial Exchange
- CSV - Comma-Separated Value (règles de format spécifiques, détaillées ici)
Échéancier
L'échéancier permet d’automatiser l’entrée de transactions répétitives tels que factures, abonnements, assurances ou impôts.
Configurez la transaction en la créant ou en utilisant un modèle d'opération existant, puis réglez quelques paramètres pour organiser l'insertion programmée. HomeBank vous informera quand la transaction est prête à être insérée ou il l'insère automatiquement pour vous.
Créer des opérations planifiées
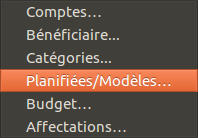
- Dans le menu Gérer, choisissez Planifiées/Modèles
:
- sélectionnez une opération modèle existante ou créez-en un nouveau
- Cochez la case Activer en bas, dans la région Insertion planifiée
- Définissez les paramètres :
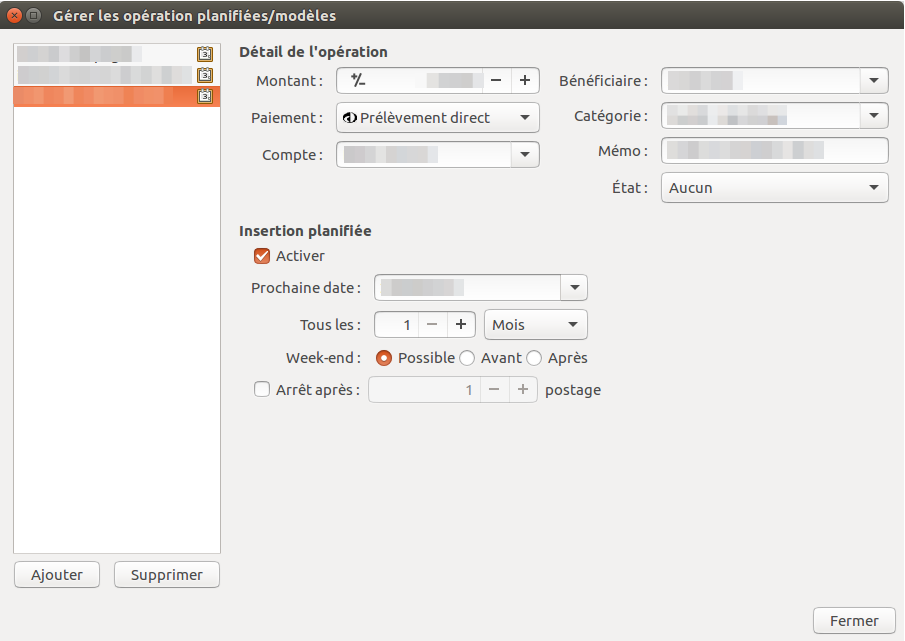
- Prochaine date
- Périodicité : chaque jour, semaine, mois, année
- Gestion du week-end
- arrêt après X fois
Configurer les options et les règles d’insertion
Par défaut, les transactions programmées seront automatiquement insérées à leur échéance quand vous ouvrez votre dossier HomeBank.
Vous pouvez modifier ce comportement à partir du menu Fichier/propriétés. La boîte de dialogue a 2 options :
- Ajouter jusqu'au xx de chaque mois (exclu)
- Ajouter x jours à l'avance d'aujourd'hui
Pour insérer à nouveau la transaction à sa date d'échéance, mettre 0 jours à l'avance d'aujourd'hui. Vous pouvez aussi accéder à cette boîte de dialogue dans le menu Opération/Définir le planificateur…
L'insertion au démarrage du programme peut être modifiée à partir de la boîte de dialogue des préférences.
Enfin, vous pouvez déclencher l’insertion dans le menu Opération/Définir le planificateur… de la fenêtre principale
Contrôler les opérations planifiées
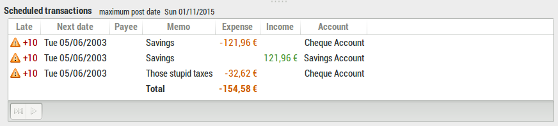
Dans la fenêtre principale, une liste d’opérations planifiées peut être affichée, c’est un résumé de chaque opération planifiée en attente. Vous pouvez contrôler la ligne de la transaction ou l’ignorer si nécessaire avec certains boutons de la barre d’outils ci-dessous. Si une opération planifiée est en retard, vous verrez une icône d’avertissement avec le nombre de jours de retard dans une limite maximum de 10. Si le dépassement excède de 10 jours, il affiche +10.
Affectation automatique
L'affectation automatique permet d'affecter automatiquement à une opération un bénéficiaire, une catégorie, ou les deux, d'après une chaîne contenue dans le mémo ou le bénéficiaire.
L'affectation est appliquée après chaque importation de fichier pour gagner du temps pour l'attribution de la catégorie et garantir le bon bénéficiaire.
Créer des règles d'affectation
Ouvrez la boîte de dialogue d'affectation à partir du menu de la fenêtre principale ou de la barre d'outils
 :
:
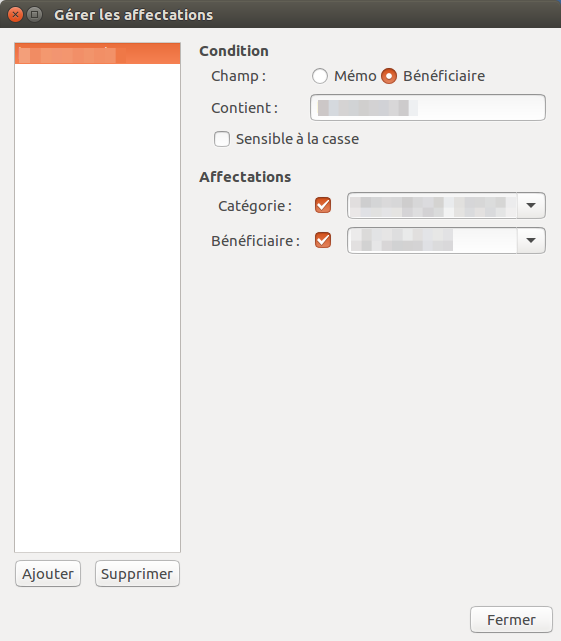
Puis créez une règle d'affectation :
- cliquez sur le bouton Ajouter
- remplissez le texte à rechercher dans le champ memo ou bénéficiaire (choisi en cochant le bouton voulu)
- éventuellement, cochez la case sensible à la casse
- sélectionnez le bénéficiaire, la catégorie ou les deux à attribuer
HomeBank attribuera le bénéficiaire et la catégorie d'une transaction si elle est vide.
Déclencher l'affectation
Les règles d'affectation se déclencheront si :
- vous la déclenchez manuellement dans la fenêtre de compte, à partir du menu Actions/Affectations auto ou de la barre d'outils
- ou après une importation de fichier dans HomeBank en utilisant l'assistant d'importation
Fonction Budget
La fonction budget permet de surveiller vos dépenses par catégorie et sous-catégorie par rapport à une présélection de budget.
Step 1: Select the accounts to exclude from the budget
By default, all accounts are included into the budget.
Open the Manage Accounts dialog from either the mainwindow-menu: Manage / Accounts, or from the Manage Accounts icon on the toolbar.
To exclude an account in the budget tick the 'exclude from the budget' option for each account on that you would not like to include in the budget.
See Manage Accounts for more details.
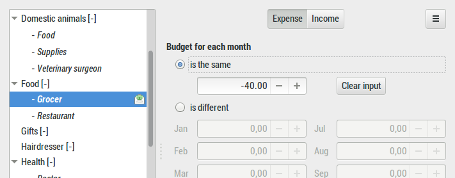
Step 2: Set a budget amount against each category
Open the budget dialog from either the mainwindow-menu: Manage / Budget, or from the Budget icon on the toolbar
Enter a budget amount against some category that you want to include in the budget. If the amount for a category is 0.00 it will not be showed in the budget until you tick the 'Force monitoring this category' checkbox at the bottom of the budget dialog.
For example, select the category 'Cash Withdrawal' and enter -50.00 in the 'Budget for each month' text box to allow spending up to 50.00 in the category 'Cash Withdrawal' each month.
See budget dialog for more details.
Step 3: View the budget report
Open the budget report window from either the mainwindow-menu: Reports / Budget, or from the budget report icon on the toolbar.
The Result column shows the difference between the amount spent and the amount budgeted.
See the budget report for more details.
Using the Vehicle cost feature
An additional capability of HomeBank is to follow the cost of each of your vehicles: fuel consumption and other costs. It will for example display some cost globally and for 100 km/miles, and some other useful informations.
Step 1: Create the vehicles categories
Create some categories for each of your vehicle. You can use categories or subcategories as well. Optionally you can set the default vehicle for the vehicle-cost report window from the wallet dialog.
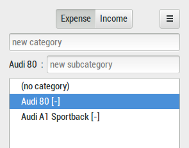
For example, create an 'Audi 80' category:
- open the category dialog
- create a category named 'Audi 80'
Step 2: Fill some transaction with vehicle-cost data's
Modify or add some transaction with necessary data's for the vehicle cost to work:
- assign the category 'Audi 80' to every transaction for this vehicle, this includes refuel, maintenance, repair, insurance, or any others costs.
- add the specific vehicle cost data's into each refuel memo field transaction, as follow. The memo field can also contains other texts as well.

- d=xxxxxx
-
the odometer at refuel time
ex.: d=92458 - v=xx.xx
-
the fuel volume for a full refuel
ex.: v=45.23 - v~xx.xx
-
the fuel volume for a partial refuel
ex.: v~15.41
Step 3: View the results into the vehicle cost report
Open the vehicle cost report, select 'Audi 80' Vehicle and view the results.
Tips & Tricks
Listview quick search
For most listview (account, payee, category, …) you can benefits from a quick search feature:
- select one item (one item must be selected for this to work)
- start typing on the keyboard the first letter of what you search
- an input box will rise, geeting the text you are typing
- you can use up/down arrow key to navigate through the item that match
Date widget key action
On every date widget, you can use some key combination to fast change the day, month or year
- up/down arrow key : change the day
- up/down arrow key + shift : change the month
- up/down arrow key + ctrl : change the year
Change the account order into main window
If you want to change the display order of your account in the main window list, you can do this from the account dialog. Just use drag & drop to re-order the accounts
Automatic cheque numbering
HomeBank also deal with automatic cheque numerating. You first need to configure the current cheque number into the account dialog. Then every time you add a new transaction, in the info field is empty, change the payment mode the cheque and the number will be filled. You can use 2 pad of cheque for each account.
Add Payee/Categories from transaction dialog
Whenever you add a transaction, you can also create a new payee/category with seizing directly a new item into the payee/category widget.
Fenêtres
Main window
- Menu
The menu is the main start point of most HomeBank actions. - Toolbar
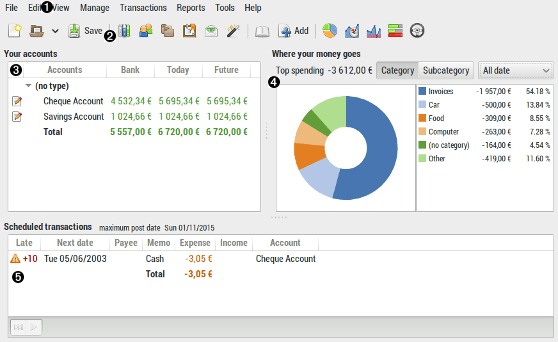
The toolbar provides easy mouse shortcut for some of the menu. All tool button have a tool tip that will help you know what action will be launched when you click on the tool button. - Your accounts
The list show you a summary of every account in the wallet. To open an account, and show its transactions, you can double-click on it, or use the toolbar, or the menu.
The first column indicate the change made to an account:
 transactions added
 transactions modified
The balance area contains the balance summary of the wallet (all accounts), see this page for details. If the minor option is checked in the preferences, a minor toggle button appear here, see this page for details. - Where your money goes
The small report show you the top 5 category spending for a predefined period. You can define the default period from the preferences and change into this main window when needed.
The top 5 categories are showed, with amount and rate, also a total balance for the period is displayed. And of course a nice pie chart ! - Scheduled transactions (next occurrence)
This list displays the next occurrence of scheduled (automated) transaction and their state, especially:- next occurrence date
- remaining days
This remaining day count is negative if the transaction insertion is overdue.
At the bootom of the list, there is 2 buttons to:
- skip the transaction post
- post the transaction occurrence
If the account is unset or the amount of the scheduled transaction is 0, the transaction dialog will popup for you to fill these information before posting.
Account window
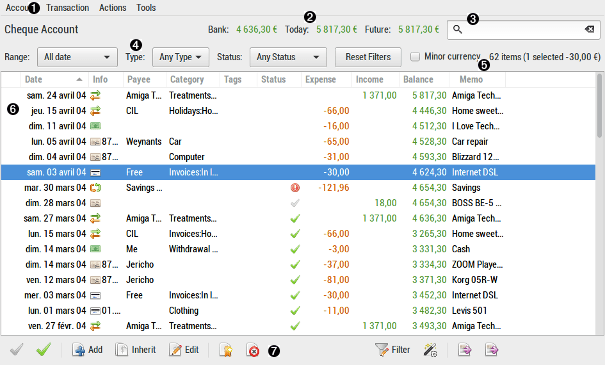
- Menu
The menu is the start of every actions on transactions. - Balance
The balance area contains the balance summary of the account, see this page for details. If the minor option is checked in the preferences, a minor toggle button appear here, see this page for details. - Quick search
The quick search will permit to filter the transaction list instantly on text column. The search apply to all columns except status, date and amount columns.
- Quick filter area
On the left, the account title is displayed.
Theses widgets will enable you to quickly filter the transaction list without opening the filter dialog.
* Range : Quick change the date range, a tooltip is displayed when you hover this widget and display the exact date range.
* Type : Restrict the listview to expense or income.
* Status : Restrict the listview to uncategorized or unreconciled. - Selected transaction informations
* Number of items displayed with total amount
* Number of transaction selected and the amount sum - Transaction list
The list show you a summary of every transaction in the account. You can use the filter dialog if necessary. Or even change the sort order by clicking on the column title. Double-click works as follow, depending of the transaction selected:
* one is selected: you open the transaction dialog in Edit mode
* multiple are selected: you can edit from menu or toolbar and open multi transaction dialog
The first column indicate the change made to the transaction:
*transaction added
*transaction modified
The Status column indicate the status of a transaction:
* : cleared
* : reconciled
* : remind
Some hotkeys are available to quickly change the status of a transaction.
Here's a few tips:
Ctrl+R on an unreconciled transaction will Reconcile
on a Reconciled transaction will ask for confirmation and toggle to ClearedCtrl+C has no effect on a Reconciled transaction
on a Cleared transaction will unclear itCtrl+W will change the status to None - Tool bar : The toolbar provides easy mouse shortcut for some of the menu. All tool button have a tool tip that will help you know what action will be launched when you click on the tool button.
Statistics report
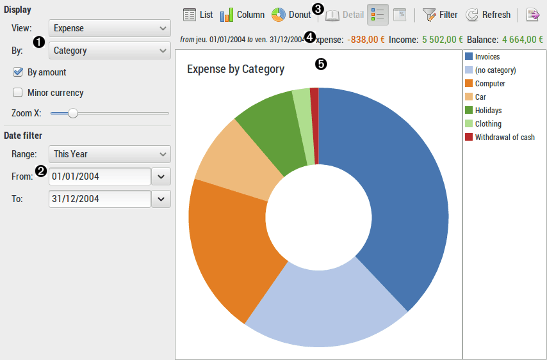
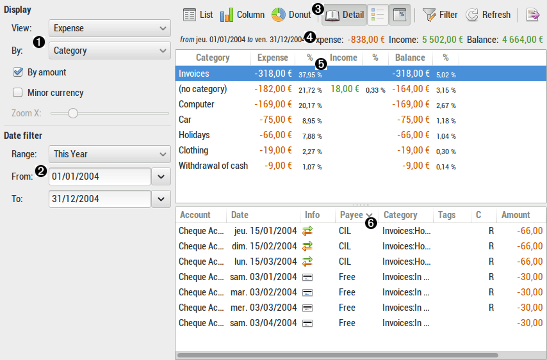
- Display
View filter the result to:
* Expense
* Income
* Balance
Items with no results, or equal to 0 will not be displayedBy specify the item the result should be computed for:
* Category
* Subcategory
* Payee
* Tag
* Month
* YearBy amount sort the result by amount instead of the default order alphabetical for Category/Payee or chronological for Month/Year Zoom X select the X zoom factor in real time - Date filter
Range fast select a date with predefined range From / To specify date bound limit to restrict the results to - Tool-bar
The tool-bar is the main control of the display. All tool-button have a tool-tip that will help you know what action will be launched when you click on the tool-button. - Total
This is the total of columns of the list-view for: Expense, Income, Balance. - Result list / Column chart / Donut chart
The result list display the computed amounts according to the current selection and filter. - Transaction detail list
The transaction detail list will show every transaction of the selected item in the above result list.
By default it is not visible. Use the tool-bar 'Toggle detail' button for changing this.
You can also default keep it visible in the Preference dialog
Trend time report
The trend time report is focused on evolution of Account, Payee, Category over the time. You are able to view a specific item, or all at once, and cumulate the results over time or not
The results are displayed by different time-slices as a listview or line chart, giving a visual view of the item over time.
Window call
- from the main window-menu: Reports / Trend time
- from the main window-tool-bar.
Using trend time report
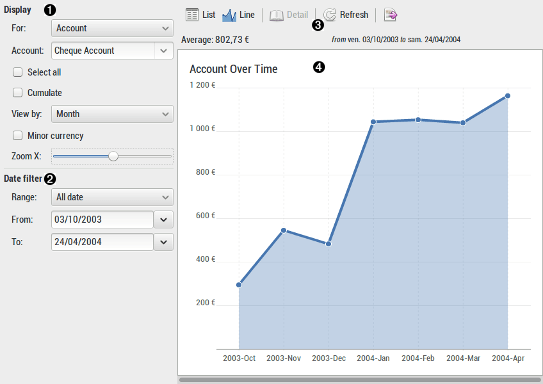
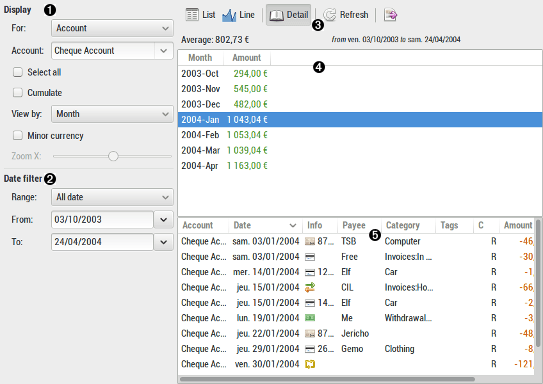
- Display
For specify the item the result should be computed for:
* Account
* Category
* PayeeAccount
Category
Payeeselect the item to display result for Select all display the result for all the items Cumulate cumulate the result instead of simple display by time slice View by specify the scale the result should be computed for:
* Day
* Week
* Month
* Quarter
* YearZoom X select the X zoom factor in real time - Date filter
Range fast select a date with predefined range From / To specify date bound limit to restrict the results to - Tool bar : The tool-bar is the main control of the display. All tool-button have a tool-tip that will help you know what action will be launched when you click on the tool-button.
- Result list : The result list display the computed amount according to the current selection.
- Transaction detail list : The transaction detail list will show every transaction of the selected item in the above result list.
By default it is not visible. Use the tool-bar 'Toggle detail' button for changing this.
You can also default keep it visible in the Preference dialog
Balance report
The balance report is an analysis part focused on the balance evolution during the time. A specific purpose will be to visually control your balance.
The transactions are displayed ordered by date in order for you to check the balance according to the minimum set in the account window.
The results are displayed into a list or with a line chart, giving a visual view of the account flow.
Window call
- from the main window-menu: Reports / Balance
- from the main window-tool-bar.
Using balance report
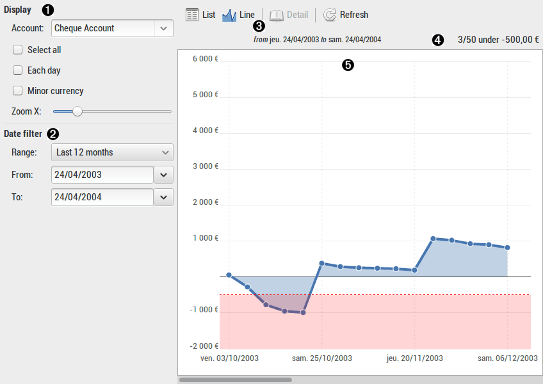
- Display
Account Select all select all accounts Each day select to display each day, in not checked only days with value are showed Zoom X select the X zoom factor in real time - Date filter
Range fast select a date with predefined range From / To specify date bound limit to restrict the results to - Tool bar : The tool-bar is the main control of the display. All tool-button have a tool-tip that will help you know what action will be launched when you click on the tool-button.
- Infos : Inform you about the number of transaction in balance, the total number of transaction and the value of the balance for this account.
- Result list : The result list display the computed balances according to the current selection.
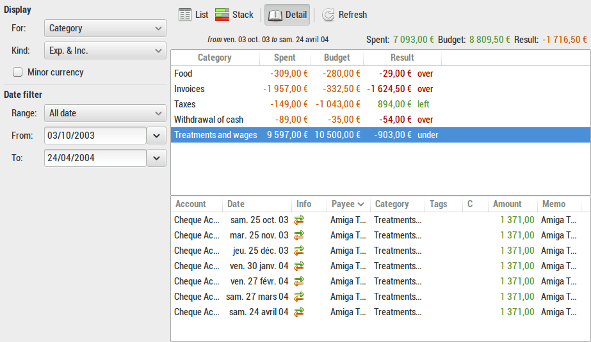
Budget report
The budget report will summarize your running budget and will display its result.
Please refer to the using the budget feature for details on how using this feature.
Window call
- from the main window-menu: Reports / Budget
- from the main window-tool-bar.
Using budget report
- Display
For select category/subcategory Kind specify the result should be computed for: Expense, Income, or both - Date filter
Range fast select a date with predefined range From / To specify date bound limit to restrict the results to - Tool bar : The tool-bar is the main control of the display. All tool-button have a tool-tip that will help you know what action will be launched when you click on the tool-button.
- Total : This is the total of columns of the list-view for: Spent, Budget and Decay
- Result list / Bar chart : The result list display the computed amounts according to the current selection.
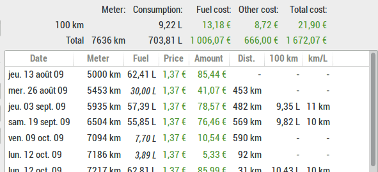
Vehicle cost report
The vehicle cost report will focus on your vehicle costs including fuel and repairs. It also display miscellaneous information like fuel consumption ans others.
Please refer to the using the vehicle cost feature for details on how using this feature.
Window call
- from the main window-menu: Reports / Vehicle cost
- from the main window-tool-bar.
Using vehicle cost report
- Display
Vehicle select the category used for your vehicle costs - Date filter
Range fast select a date with predefined range From / To specify date bound limit to restrict the results to - Global results
Meter the meter of the vehicle Consumption fuel consumption Fuel cost cost of the consumed fuel Other cost the other cost for the vehicle (insurance, repair, …), which mean the transaction affected to the current vehicle cost category not containing (d=xx v=xx) Total cost the total cost for the vehicle in the selected period - Detailed results : This is a list-view which contains the detailed date by date refuel done for the selected vehicle.
The list is sortable, just click into the column title to change the sort order.
At the bottom is the total line, except for price which is the average price by liter.
Menus
Main window menu
The menu are the main start point of most HomeBank actions. Here is a short description of it:
  Edit
  View
  Manage
  Transactions
  Reports
  Tools
  About
File
New clear all, after a confirmation if change were made to the current wallet Open… open a wallet, after a confirmation if change were made to the current wallet Save save the current wallet Save as… save the current wallet with a new name:Revert revert to the last saved version of the current file Properties… open the properties dialog Import… * QIF file…
* OFX/QFX file…
* CSV file…
all these will open the import assistant dialogExport QIF file export all data's to QIF format Close close the current wallet Quit exit HomeBank Edit
- Preferences…
- open the preferences dialog
View
- Toolbar
- Toggle display of the toolbar
- Top spending
- Toggle the display of the top spending
- Scheduled list
- Toogle the display of the scheduled list
- Minor currency
- Display using the euro minor currency
Manage
- Accounts…
- open the account dialog
- Payees…
- open the payee dialog
- Categories…
- open the categories dialog
- Scheduled/Template…
- open the scheduled/template dialog
- Budget…
- open the budget dialog
- Assignments…
- open the assignment dialog
Transactions
- Show…
- open the account window for the selected account
- Add…
- open the transaction dialog
- Set scheduler…
- open the properties dialog to setup the scheduler
- Post scheduled
- post any pending scheduled transaction according the current rules
Reports
- Statistics…
- open the statistic report
- Trend time…
- open the trend time report
- Balance…
- open the balance report
- Budget…
- open the budget report
- Vehicle cost…
- open the vehicle cost report
Tools
- Show welcome dialog…
- Open the first start using HomeBank dialog, like you were using HomeBank for the first time. This will let you choose among several action to perform, like creating a blank account
- File statistics…
- Open the file statistics dialog, showing the number of account, transaction and so on.
- Anonymize…
- After a confirmation, this will change every label to anonymize your accounts, payee, categories, memo, etc.
Help
- Contents
- Open the local help (on disk)
- Get Help Online
- Ask a question to the community (online)
- Translate this Application
- Translate to your language (online)
- Report a problem
- Report a bug (online)
- About
- Open the about dialog
Account window menus
The menu is the start of every actions on transactions.
Account
- Export QIF…
- export transaction to a QIF file
- Export CSV…
- export transaction to a CSV file, see CSV file format
- Close…
- close the account window
Transaction
- Add…
- open the transaction dialog in Add mode
- Inherit…
- open the transaction dialog pre-fill it with the selected transaction
- Edit…
- open the transaction dialog in Edit mode
- Status > None
- change the status to none ⇒ confirmation will be asked if already Reconciled
- Status > Cleared
- toggle cleared state if possible ⇒ no effect on a Reconciled transaction
- Status > Reconciled
- toggle reconciled state if possible ⇒ confirmation will be asked if already Reconciled
- Create template…
- create some template from the selected transaction(s)
- Delete…
- delete the selected transaction(s)
Actions
- Auto. assignments
- run automatic assignment rules on the current account, see automatic assignments
Tools
- Filter…
- open the filter dialog
- Convert to euro…
- After a confirmation, this will convert the account to euro major currency according the preferences currenctly set
Boîtes de dialogue
Transaction dialog
The transaction dialog is used to add, edit and manage the transactions.
Dialog call
- mainwindow-menu: Transaction / Add…
- mainwindow-toolbar.
- from the account window-menu: Transaction / Add… / Inherit… / Edit…
- from the account window transaction list: by double-click on an transaction
Using transaction dialog
The 'Add' button enable to add an transaction and keep the transaction dialog open to add more transactions.
- Use a template
Select a source template definition to fill in the transaction dialog fields. - et
- Transaction details
Date date of the transaction (dd.mm.yy).
- use shift key + arrow up/down to increase/decrease date.
- the right side button popup a full calendarAmount amount of the transaction
- the right side +/- button toggle between income/expensePayment payment for the transaction. It will be displayed as small icons. See the lexicon for payment detail Of notebook 2
To accountthese fields appears depending on the payment selected:
for cheque: select the 2nd cheque notebook for internal transfer: select the destination accountInfo additional informations such as real date or value date, cheque numbers, other numbers related to the transaction.
this field is automatically filled for cheque numbers.Account account the transaction should be attached to. Payee payee of the transaction, see payee definition for further details. Category category of the transaction, see category definition for further details. Memo memo of transaction.
and optionally vehicle cost data's, see vehicle cost.Tags tags of the transaction, see tag definition for further details. Status Split transaction dialog
The split dialog is used to edit,modify and manage the split of a transaction.
Dialog call
- transaction dialog: S button
Using split transaction dialog
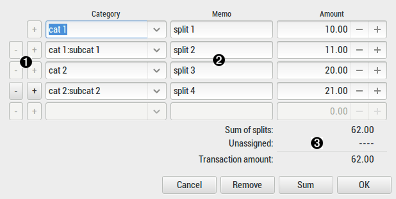
- - / + buttons
- - : allows to remove a split line
- + : allows to add a split line
Split line details- Category : the category of the split line
- Memo : the memo of the split line
- Amount : the amount of the split line
Split informations
Depending on the context, the following will be displayed:- Sum of splits : sum of every split lines
- Unassigned : remaining amount for the split: transaction amount - sum of splits
- Transaction amount : transaction amount as a remind
Multiple transaction dialog
The multiple transaction dialog is used to edit multiple field of multiple transactions at the same time.
Dialog call
- from the account window-menu: Transaction / Multiple edit
- account window toolbar.
Using multiple transaction column edition
- select several transaction
- use the menu or toolbar 'Multiple edit'
- tick the fields you want to mass edit
- select/fill the right value
Please refer to transaction dialog for description of fields.
The following is not multiple editable
- Date
- Amount, Income, Expense
- Payment, in case an internal xfer is part of the selection
- hidden column of the listview
Internal transfer dialog
The internal transfer dialog is used to pick a target transaction for internal transfer transactions.
Dialog call
This dialog will popup when you change a transaction paymode to internal transfer and HomeBank detect some potential target transaction to link to this transfer.
Using transfer selection dialog
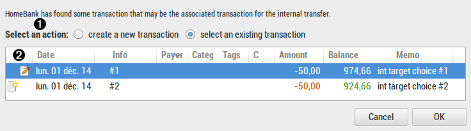
- Select an action
- create a new transaction : will choose to create a new transaxction and ignore the transaction proposed into the below list.
- select an existing transaction : will link the actual transaction to the selected one as the transfer target.
Transaction list : list of transaction that may match the source transaction you just changed as an internal transfer.Scheduled/Template transactions dialog
The Scheduled/Template transactions dialog is used to add, edit and manage the scheduled / template of the current wallet.
Dialog call
- mainwindow-menu: Manage / Scheduled/Template…
- mainwindow-toolbar.
Using Scheduled/Template transactions dialog
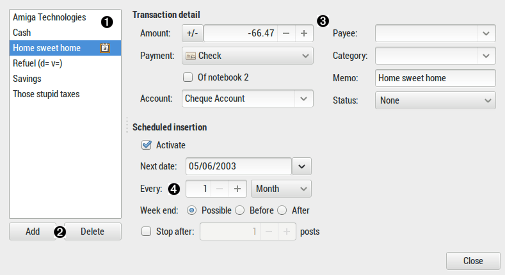
- Sheduled/Template list : display the actual list of Scheduled/Template transactions in the wallet. It is always sorted in alphabetic order. Scheduled transaction ar marked with a calendar icon:

- Buttons
- Add : add a new empty template.
- Delete : delete the active template.
Transaction details : Please refer to transaction dialog for these fields.Scheduled insertion- Activate : set this template to be scheduled
- Next date : specify the date of the next insertion, when you first edit you should set it manually, then it is updated automatically. You can of course adjust it later if needed.
- Every : set the insertion interval to every xx:
- Day
- Week
- Month
- Year
Week-end : define how to manage the post date when it occurs on a weekend:- Possible : don't care
- Before : move to first day before
- After : move to first day after
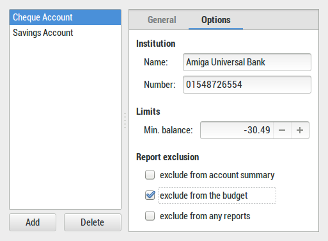
Stop after xx posts : limit the insertion to a finished countAccounts dialog
The accounts dialog is used to add, edit and manage the accounts of the current wallet.
Dialog call
- mainwindow-menu: Manage / Accounts
- mainwindow-toolbar.
Using accounts dialog

- Account list : display the actual list of accounts in the wallet. The account at the top of the list will be the one to be displayed when opening your wallet. You can easily change the accounts order using Drag&Drop process.
- Buttons :
- Add : add a new empty account.
- Delete : delete the active account. This is only possible if the account has no transactions.
Account- Type : specify the type of the account
- Start balance : specify the initial balance amount, i.e the balance before the first transaction.
- This account was closed : specify the bank account is closed.
Please also note that closed account are no more considered for reports.
Current cheque number- Checkbook 1 : specify the next cheque number of pad1 to be used (this is auto updated later when you add some transactions).
- Checkbook 2 : some of the above but for a second cheque pad (for a joined account)
Institution- Name : specify the bank name where the account is registered.
- Number : specify the bank account number itself.
Limits- Minimum : specify the balance threshold, if you have an authorized balance, this will be used in the Balance report window.
Report exclusion- Exclude from account summary : the account will must not be used into the account summary list of the main window.
- Exclude from the budget : the account will not be used for the budget datas.
- Exclude from any reports : the account will not be used for any report datas.
Payees dialog
The payees dialog is used to add, edit and manage the payees of the current wallet.
Dialog call
- mainwindow-menu: Manage / Payees…
- mainwindow-toolbar.
Using payees dialog
- Payee name : type a new payee name here and press return to add.
- Payee list : display payee name and usage count
- Buttons :
- Edit : open a dialog to edit the selected payee
- Merge : merge the current payee to a new one you will select
- Delete : delete the selected payee
Menu Button- Import : Import and merge some payees from a csv file
- Export : export the entire payee list into a csv file
- Delete unused : delete all unused payee
Please refer to csv file format for the file description.
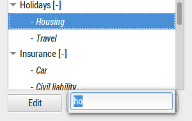
Categories dialog
The categories dialog is used to add, edit and manage the categories of the current wallet.
Dialog call
- mainwindow-menu: Manage / Categories.
- mainwindow-toolbar.
Using categories dialog
- Expense/Income switcher : Toggle the category list with Expense/Income categories only
- Category name : type a new category name here and press return to add.
Subcategory name :- select the category to add subcategory to in the category list
- type a new subcategory name here and press return to add.
Categories list : display category name and usage countButtons :- Edit : open a dialog to edit the selected category
- Merge : merge the current category to a new one you will select
- Delete : delete the selected branch or categories, i.e. if a category is selected, all subcategories will be deleted
Menu Button- Import : Import and merge some categories from a csv file
- Export : export the entire categories list into a csv file
- Delete unused : delete all unused category
Please refer to csv file format for the file description.
Assignments dialog
The assignments dialog is used to add, edit and manage the assignment rules of the current wallet.
Please refer to the Using the Automatic assignment feature for details on how using this feature.
Dialog call
- mainwindow-menu: Manage / Assignments…
- mainwindow-toolbar.
Using assignments dialog
- Assignment list : display the actual list of assignments in the wallet. It is always sorted in alphabetic order.
- Buttons :
- Add add a new empty assignment.
- Delete delete the active assignment.
Condition- Field Memo/Payee
- Contains set the text to search
- Case sensitive set the search to consider uppercase and lowercase different, otherwise the same
Automatic assignments- Category the category to optionaly assign
- Payee the payee to optionaly assign
Budget dialog
The budget dialog is the main interface to edit, modify and manage your budget.
Please refer to the using the budget feature for details on how using this feature.
Dialog call
- mainwindow-menu: Manage / Budget
- mainwindow-toolbar.
Using budget dialog
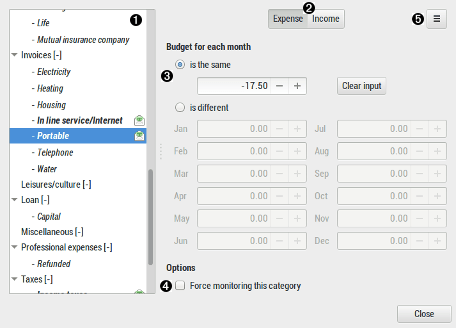
- Category list : display the list of categories and subcategories of the current wallet.
budgeted transaction are displayed bold and marked with a money-envelope icon:
- Expense/Income switcher : Toggle the category list with Expense/Income categories only
- Budget for each month :
- is the same : category budget will be the same for every month: Jan → Dec
you can then fill the amount below - Clear input : clear any budget for the selected category
- is different : category budget will be specific each month
you can then fill the amount of each needed months - Jan to Dec : The amount for each month
Options- Force monitoring this category : By default, if a transaction has no amount (0.00) it it not displayed into the budget report. This checkbox will change this and can manage such case.
Menu button- Import : import the budget from a csv file.
See csv file format for details. - Export : export the budget to a csv file.
See csv file format for details.
Preferences dialog
The preferences dialog can be accessed from the main window menu, as Edit-Preferences. It lets you customize many aspects of the way HomeBank works. The following sections detail the settings that you can customize, and what they affect.
General
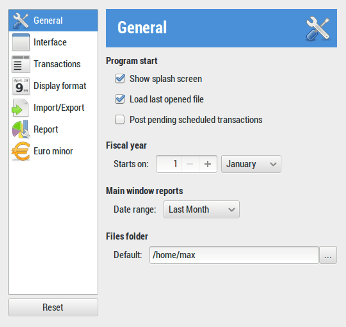
- Program start
Show splash screen display a splash screen when HomeBank start Load last opened file load the last opened file when HomeBank start Post pending scheduled transactions append scheduled transaction to accounts when HomeBank start - Fiscal year
Start on define on which day and month the fiscal year start - Main window reports
Date range default range initial value for the main window reports - Files folder
Default default folder to load/save HomeBank files Interface
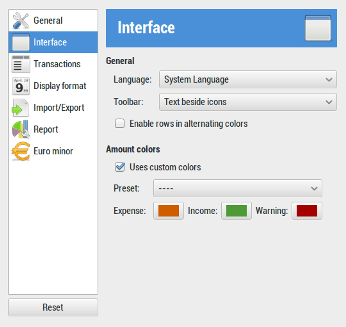
General
Language define what language to use for the interface Toolbar tool-bar style to be used Enable rows in alternating colors specify if the alternate lines colors should be used for tree-view/list-view (this depends on the current GTK+ theme an may not work) Amount colors
Uses custom colors specify if amounts should be displayed with colors below Preset contains some Tango color preset to fast set the amount colors Expense color used for expense Income color used for incomes Warning color used for amount in warning (overdrawn) Transactions
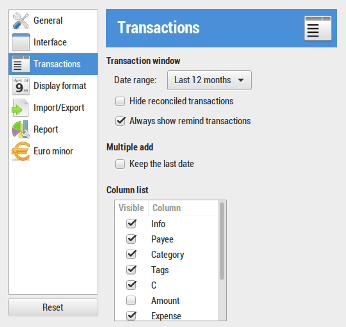
- Transaction window
Date range Set the default range to be used for account window Hide reconciled transactions set the filter for account window not to default show reconciled transactions Always show remind transactions set the remind transaction to always be display (ignore filters) - Multiple add
Keep the last date Set the date to be kept when you add several transaction successively - Column list
Set the column to display and their order for the transaction list
Display format
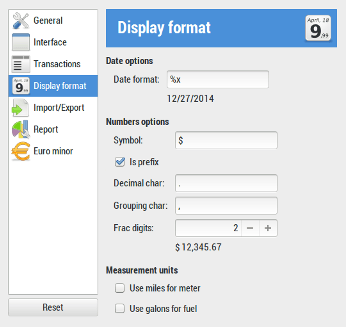
- Date options
- Date format
- display format used for date
- A date sample is displayed
- Numbers options
- Symbol
- Symbol that prefix the amount
- Is prefix
- define is the symbol is a prefix symbol
- Decimal char
- Character to be used as decimal separator
- Grouping char
- Character to be used as grouping separator
- Frac digits
- Number of digits after decimal separator
An amount sample is displayed
- Measurement units
- Use miles for meter
- use the mile labels and abbreviation for the vehicule cost
- Use galons for fuel
- use the galons labels and abbreviation for the vehicule cost
Import/Export
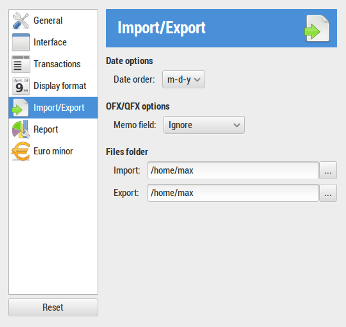
- Date options
- Date order
- set the default date order for file import
- d-m-y
- m-d-y
- y-m-d|
- OFX/QFX options
- Memo field
- define what to do for memo field during import:
- ignore
- append to memo
- append to info
- Files folder
- Import
- default folder to load files to import
- Export
- default folder to save files to export
Report
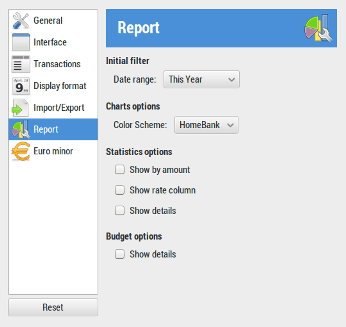
- Initial filter
- Date range
- Set the default range to be used for account window
- Charts options
- Color scheme
- Set the default color scheme to be applied for charts
- HomeBank
- Money
- SAP
- Quicken
- Office 2010
- Office 2013
- Analytics
- Statistics options
- Show by amount
- set the by amount toggle on the statistics window to default be checked
- Show rate column
- set the rate column to be displayed by default
- Show details
- set the detail toggle on the statistics window to default be checked
- Budget options
- Show details
- set the detail toggle on the budget window to default be checked
Euro minor
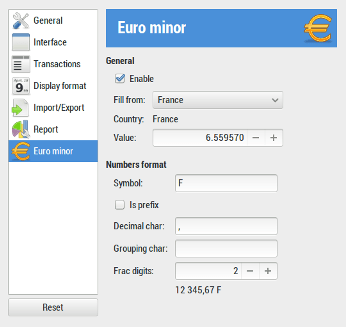
- General
- Enable
- enable euro minor currency support in HomeBank.
see minor currency for more details. - Fill from
- preselect of parameters for this tab
- Country
- remind of the filled country from
- Value
- change rate (value of 1 euro in your old national currency)
- Numbers format
- Symbol
- Symbol that prefix the amount
- Is prefix
- define is the symbol is a prefix symbol
- Decimal char
- Character to be used as decimal separator
- Grouping char
- Character to be used as grouping separator
- Frac digits
- Number of digits after decimal separator
Filter dialog
The filter dialog is used to adjust the filter for transaction from the account window and the statistics window.
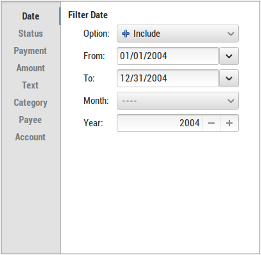
Filter date
Option set this filter status:
* inactive
* include
* excludeFrom the date minimum value To the date maximum value Month set a specific month Year set a specific year Filter status
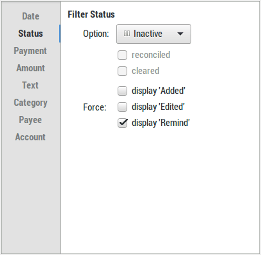
Option set this filter status:
* inactive
* include
* excludereconciled select the reconciled transactions cleared select the cleared transactions Force display 'Added' force transaction in 'added' status to always be displayed Force display 'Edited' force transaction in 'edited' status to always be displayed Force display 'Remind' force remind transaction to always display
Filter payment
Option set this filter status:
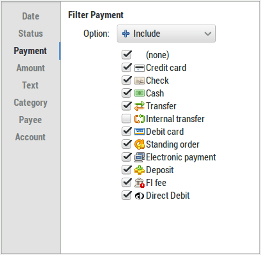
* inactive
* include
* excludepayment see the lexicon for payment detail Filter amount
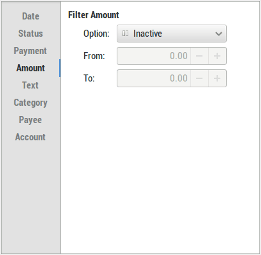
Option set this filter status:
* inactive
* include
* excludeFrom the amount minimum value To the amount maximum value Filter text
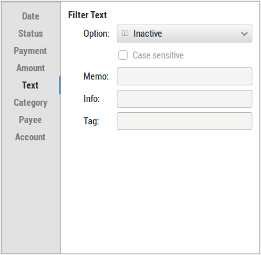
Option set this filter status:
* inactive
* include
* excludeMemo the memo string to search Info the info string to search Tag the tag string to search Filter Category/Payee/Account
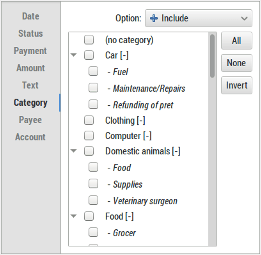
These tabs all function-the same manner. You can filter these using a list of item, including or excluding the selected items.
The account tab is not showed when you filter from the account window, it is showed only from the statistics dialog.
Option set this filter status:
* inactive
* include
* excludeAll will select all the items in the list None will unselected all the items in the list Invert will invert all the items in the list Properties dialog
The properties dialog is used to edit, modify and manage the wallet properties.
Dialog call
- mainwindow-menu: File / Properties
Using properties dialog
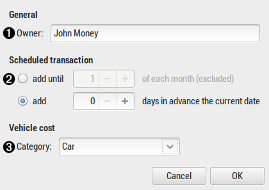
- General
- Owner : specify the title for the wallet, this will be used as the main window title.
Scheduled transaction- Add until xx of each month (excluded) : specify the day number of the month until which the scheduled transaction will be automatically added.
- Add x days in advance the current date : specify a number of days to add to the today's date (limit of insertion) when HomeBank insert automated transactions.
For example: you specify 30 days here, HomeBank will insert automated transactions that should occur till today + 30 days.
Vehicle cost- Category :specify the default category for the Vehicle cost report.
Divers
CSV file format
With HomeBank you can import/export some of the internal data's in the most common file format that is CSV.
meanwhile csv should uses comma as separator, HomeBank uses semi-colon as separator (this is most common than comma)
The format used for the different files is specific to HomeBank, so don't expect to import files your bank should offers you directly, you will need to arrange it a little in a spreadsheet like Gnumeric before.
Below is a description with example of the CSV format that HomeBank uses.
Transaction
- date
- format must be DD-MM-YY
- paymode
- from 0=none to 10=FI fee
- info
- a string
- payee
- a payee name
- memo
- a string
- amount
- a number with a '.' or ',' as decimal separator, ex: -24.12 or 36,75
- category
- a full category name (category, or category:subcategory)
- tags
- tags separated by space
- tag is mandatory since v4.5
Example:
15-02-04;0;;;Some cash;-40,00;Bill:Withdrawal of cash;tag1
15-02-04;1;;;Internet DSL;-45,00;Inline service/Internet;tag2
...
Budget
- type
-
- *
- = monthly
- blank
- = month value
- category
- the category name
- value(s)
-
- 1 amount
- if the type is monthly
- 12 amounts, separated by ';'
- if type month value
Example:
*;Fuel;45.00
 ;Domestic animals;1.00;2.00;3.00;4.00;...
*;Food;17.00
...
Category
- level
-
- 1
- = category
- 2
- = subcategory
- type
-
? -
- = expense ? +
- = income
- category name
- the category name
Example:
1;-;Food
2; ;Grocer
2; ;Restaurant
1;+;Wage
...
Payee
- payee name
- the name of the payee
Example:
payee_name1
payee_name2
...
Soldes
HomeBank propose 3 soldes couvrant l'ensemble du cycle de vie de vos comptes.
Les 3 différents soldes
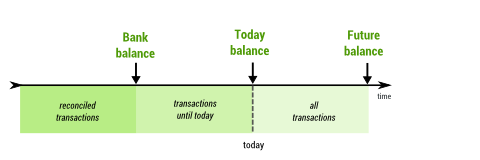
- Banque
- solde de toutes les transactions rapprochées ; cela devrait donc être le même solde que celui de la dernière instruction rapprochée
- Aujourd'hui
- solde des transactions jusqu'à aujourd'hui : solde bancaire + montant du de toutes les transactions depuis ce temps jusqu'à aujourd'hui
- Futur
- solde de toutes les transactions : inclut toutes les transactions actuellement sur le compte
les transactions à l'état
“Rappel” ne sont jamais prises en compte dans les soldes
Rapprochement bancaire
Dans HomeBank,Le rapprochement bancaire (vérification des transactions par rapport au relevé bancaire) se fait manuellement.
Comment faire le rapprochement ?
Pour commencer, votre solde bancaire doit être le dernier rapproché avec le précédent relevé bancaire.
Ensuite, vous validez chaque transaction et normalement le solde bancaire de HomeBank correspond à celui de votre relevé.
Que faire si les soldes ne sont pas égaux ?
Si les soldes ne sont pas égaux à la fin du rapprochement, mesurez l’écart. Les transactions qui ont changé sont identifiées par la petite icône qui indique qu'ils ont été édités.
Le filtre peut aider.
Enfin, il est parfois plus facile de revenir en arrière et de recommencer le rapprochement au début.
Euro mineur
Pour les pays de la zone européenne, ou qui utilisent l'Euro (EUR), HomeBank offre quelques fonctionnalités supplémentaires pour afficher en Euro majeur/mineur, et de convertir si nécessaire.
Cela couvre les 2 situations:
- dans l'attente d'un passage à l'euro, l'euro est alors mineur, et votre monnaie nationale est majeure
- après un passage à l'euro, l'euro est alors majeur, et votre monnaie nationale est mineure
Affichage en euro
La configuration des propriétés de devises mineures se fait dans la boîte de dialogue des préférences.
Une fois les paramètres correctement définis, vous pouvez passer la plupart des affichages en monnaie mineure, qui peut être l'Euro si votre pays est en attente d'un passage à l'euro, ou l'ancien monnaie nationale si votre pays est déjà passé à l'euro.
Lorsque la monnaie mineure est activée, un menu permettant de besculer entre les monnaies apparaît dans la plupart des fenêtres.
Convertir en monnaie Euro
Dans la fenêtre de compte, menu Outils/Convertir en euro, vous pouvez convertir un compte entier en euro, selon les paramètres que vous avez configurés dans les préférences.
Cela pourrait aussi servir si un pays revenait de l’euro à une monnaie nationale, le taux de configuré dans les préférences devant juste être correct.
Lexique
Voir la page Homebank : lexique


